Exercises
Basic muscle conditioning
Wall push-up
slide 1 of 4
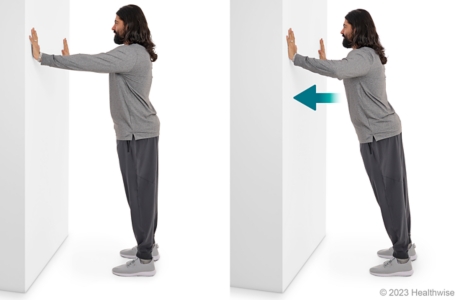
slide 1 of 4, Wall push-up,
- Stand facing a wall with your feet about 12 to 24 inches from the wall. If you feel any pain when you do this exercise, stand closer to the wall.
- Place your hands on the wall at shoulder height, slightly wider apart than your shoulders. Turn your fingers out a little, rather than straight up and down.
- Slowly bend your elbows and bring your face toward the wall, keeping your shoulders and hips lined up. Then slowly push back to the starting position. Keep the motion smooth and controlled.
- Repeat 8 to 12 times.
When you can do this exercise against a wall with ease and no pain, you can try it against a counter. You can then slowly progress to the end of a couch, then to a sturdy chair, and finally to the floor.
Quadriceps (thigh) strengthening
slide 2 of 4
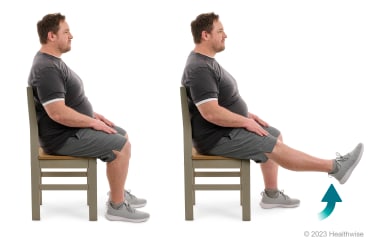
slide 2 of 4, Quadriceps (thigh) strengthening,
- While sitting in a chair, straighten one leg and hold for 6 seconds. Do not lock your knee. Then slowly lower your leg.
- Repeat 8 to 12 times with each leg.
When this exercise becomes easy, you can add a light weight to your ankle.
Hip abduction (lying on side)
slide 3 of 4
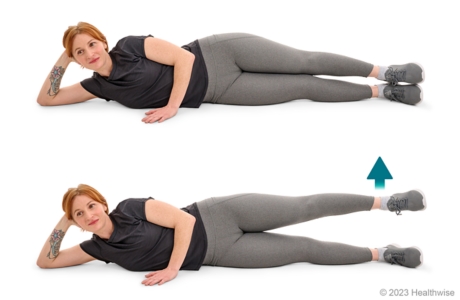
slide 3 of 4, Hip abduction (lying on side),
- Lie on your side, with your affected leg on top. You can use your hand or a pillow to support your head.
- Keep your knee straight and your leg in a straight line with your body.
- Lift your affected leg straight up toward the ceiling, about 12 inches off the floor. Hold for about 6 seconds, then slowly lower your leg.
- Repeat 8 to 12 times.
- It's a good idea to repeat these steps on your other side.
- Keep your kneecap pointing forward.
- Don't let your hip drop back.
Shallow standing knee bend
slide 4 of 4
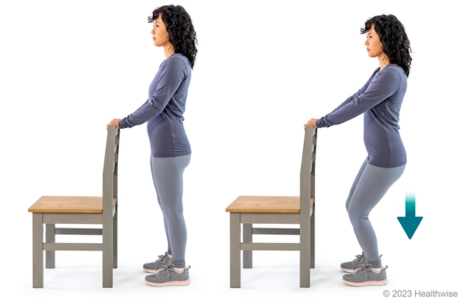
slide 4 of 4, Shallow standing knee bend,
- Stand with your hands lightly resting on a counter or chair in front of you. Put your feet shoulder-width apart.
- Slowly bend your knees so that you squat down like you're going to sit in a chair. Make sure that your knees don't go in front of your toes.
- Lower yourself about 6 inches. Your heels should stay on the floor at all times.
- Rise slowly to a standing position.
- Repeat 8 to 12 times.
Resistance training with exercise bands
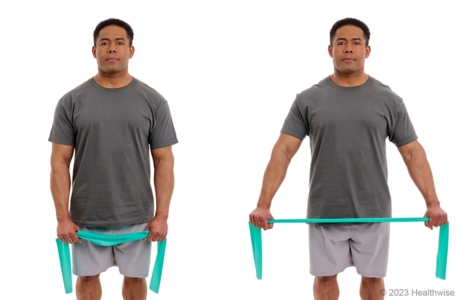
Side pull
slide 1 of 5
slide 1 of 5, Side pull,
- Sit or stand up straight. Grasp an exercise band with your hands about shoulder-width apart.
- Raise both arms overhead, palms of your hands facing forward.
- Slowly pull one arm down and to the side, bending your elbow and stretching the band until your elbow is at shoulder height. Hold for 1 to 2 seconds.
- Slowly return to the starting position with your arms straight up.
- Repeat with the other arm.
- Repeat 8 to 12 times with each arm.
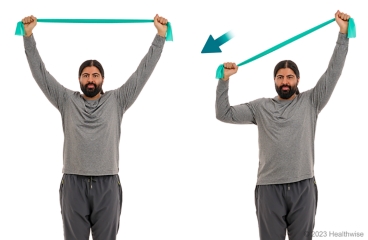
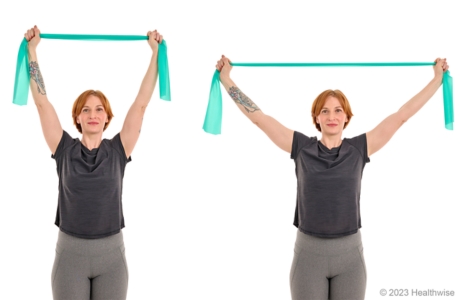
Overhead pull
slide 2 of 5
slide 2 of 5, Overhead pull,
- Sit or stand up straight. Grasp an exercise band with your hands about shoulder-width apart.
- Raise both arms overhead, palms of your hands facing forward.
- Slowly pull your hands apart, stretching the band. Hold for 1 to 2 seconds.
- Slowly return to the starting position with your arms straight up.
- Repeat 8 to 12 times.
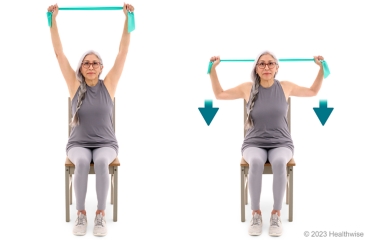
Up-down pull
slide 3 of 5
slide 3 of 5, Up-down pull,
- Sit or stand up straight. Grasp an exercise band with your hands about shoulder width apart.
- Raise both arms overhead.
- Bend your elbows until they are at shoulder height, with the stretched band either behind or in front of your head. Hold for 1 to 2 seconds.
- Slowly return to the starting position with your arms straight up.
- Repeat 8 to 12 times.
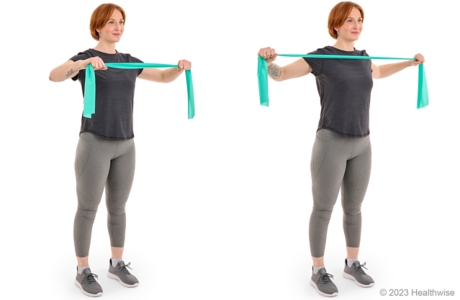
Chest-level pull
slide 4 of 5
slide 4 of 5, Chest-level pull,
- Sit or stand up straight. Grasp an exercise band with your hands about shoulder-width apart.
- Raise your arms to chest level and bend your elbows.
- Slowly pull your hands apart and your shoulder blades together, stretching the band. Hold for 1 to 2 seconds. Try to keep your hands up at your chest level, and do not pull your shoulders up toward your ears.
- Slowly return to your starting position.
- Repeat 8 to 12 times.
Hip-level pull
slide 5 of 5
slide 5 of 5, Hip-level pull,
- Stand or sit up straight in a chair without arms. Grasp an exercise band with your hands about shoulder-width apart.
- Hold your hands at the level of your hips, or near your lap if you are sitting down.
- Slowly pull your hands apart, stretching the band. Hold for 1 or 2 seconds.
- Slowly return to your starting position.
- Repeat 8 to 12 times.
Weight training with free weights
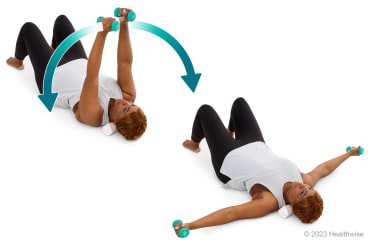
Chest fly (lying down)
slide 1 of 3
slide 1 of 3, Chest fly (lying down),
- Lie on a bench or exercise ball, and hold light weights straight up over your chest. You can also use soup cans or filled water bottles for weights. Do not lock your elbows. You can keep them slightly bent if that is more comfortable.
- Slowly lower your arms, keeping them extended, until the weights are level with your chest or slightly lower.
- Slowly raise your arms until you are in the starting position.
- Repeat 8 to 12 times.
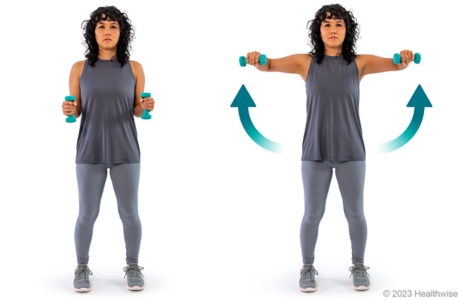
Arm raise to the side (elbows bent)
slide 2 of 3
slide 2 of 3, Arm raise to the side (elbows bent),
- Stand with your feet shoulder-width apart and your knees slightly bent. Or sit up straight in a chair.
- Hold a 1- to 2-pound weight in each hand. The weight may be a dumbbell, a can of food, or a filled water bottle.
- Bend your elbows 90 degrees while keeping them at your sides. With your palms facing in, hold the weights straight in front of you.
- Slowly lift the weights and your elbows out to the sides to shoulder level, keeping your elbows bent. Keep your shoulders down and relaxed as you lift. If you find that you are shrugging your shoulders up toward your ears, your weights may be too heavy. Try using lighter weights (or even no weights).
- Slowly lower the weights and your elbows until your elbows are back at your sides.
- Repeat 8 to 12 times.
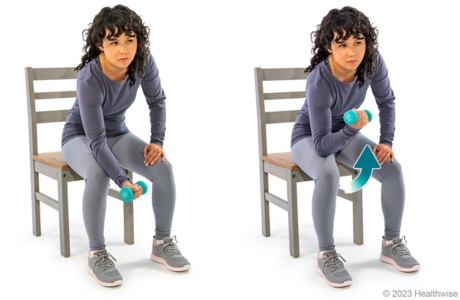
Biceps curl
slide 3 of 3
slide 3 of 3, Biceps curl,
- Sit leaning forward with your legs slightly spread apart and your left hand on your left thigh.
- Hold a 1- to 2-pound weight in your right hand. The weight may be a dumbbell, a can of food, or a filled water bottle.
- Place your right elbow on your right thigh, keeping your elbow slightly bent.
- Slowly lift (curl) the weight up and toward your chest.
- Slowly return it to the starting point.
- Repeat 8 to 12 times.
- Repeat these steps with your other arm.
Current as of: July 31, 2024
Author: Ignite Healthwise, LLC Staff
Clinical Review Board
All Healthwise education is reviewed by a team that includes physicians, nurses, advanced practitioners, registered dieticians, and other healthcare professionals.