How to do the exercises
Pendulum swing
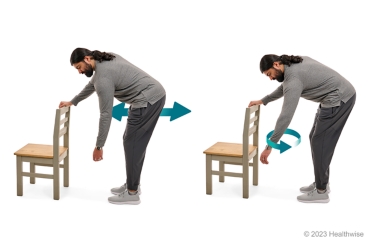
- Hold on to a table or the back of a chair with your unaffected arm. Then bend forward a little and let your affected arm hang straight down. This exercise does not use the arm muscles. Rather, use your legs and your hips to create movement that makes your arm swing freely.
- Use the movement from your hips and legs to guide the slightly swinging arm forward and backward like a pendulum (or elephant trunk). Then guide it in circles that start small (about the size of a dinner plate). Make the circles a bit larger each day, as your pain allows.
- Do this exercise for at least 1 minute. Do it at least 3 times a day.
As you have less pain, try bending over a little farther to do this exercise. This will increase the amount of movement at your shoulder.
Shoulder stretch (posterior)
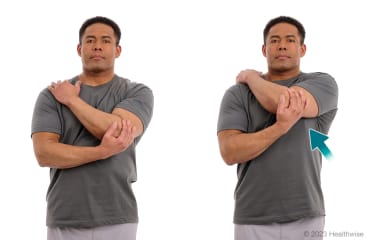
- Relax your shoulders. Hold the elbow of your affected arm with your other hand.
- Use your hand to pull your affected arm gently up and across your body. You will feel a gentle stretch across the back of your affected shoulder.
- Hold for at least 15 to 30 seconds, then slowly lower your arm.
- Repeat 2 to 4 times.
- If you can, repeat these steps for your other shoulder.
Up-the-back shoulder stretch
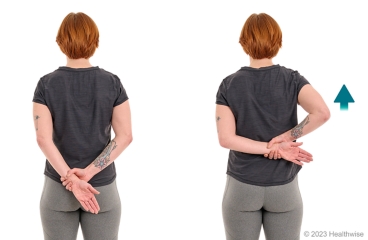
Your doctor or physical therapist may advise you to wait to do this stretch until you have regained most of your range of motion and strength.
- Stand or sit up straight. If you're standing, keep your feet about hip-width apart.
- Hold any of these stretches for at least 15 to 30 seconds.
- Repeat 2 to 4 times.
- If you can, repeat these steps for your other shoulder.
- Light stretch: Put the hand of your affected arm in your back pocket (palm outward). Let it rest there to stretch your shoulder.
- Moderate stretch: With your other hand, hold your affected arm (palm outward) behind your back by the wrist. Pull your arm up gently to stretch your shoulder.
- Advanced stretch: Put a towel over your other shoulder. Put the hand of your affected arm behind your back. Now hold the back end of the towel. With the other hand, hold the front end of the towel in front of your body. Pull gently on the front end of the towel. This will bring your hand farther up your back to stretch your shoulder.
Shoulder extensor stretch (supported)
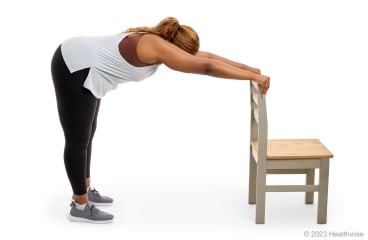
- Standing about an arm's length away, grasp onto a solid surface. You could use a countertop, a doorknob, or the back of a sturdy chair.
- With your knees slightly bent, bend forward with your arms straight. Lower your upper body, and let your shoulders stretch. As your shoulders are able to stretch farther, you may need to take a step or two backward.
- Hold for at least 15 to 30 seconds. Then stand up and relax. If you stepped back during your stretch, step forward as you stand up so you can keep your hands on the solid surface.
- Repeat 2 to 4 times.
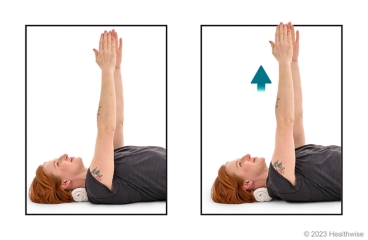
Shoulder extensor stretch (lying down, with wand)
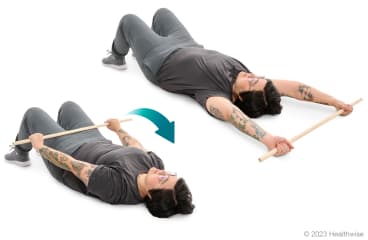
- Lie on your back with your knees bent. Hold a wand with both hands, placing one hand near each end of the wand. (You can also use a broom handle or anything stiff and about 3 feet long.) Your palms should face down as you hold the wand. Straighten your elbows and rest the wand on your legs, just below your hips. This is your starting position.
- Keeping your elbows straight, slowly raise your arms over your head. Raise them until you feel a stretch in your shoulders, upper back, and chest. Try not to shrug your shoulders.
- Hold for 15 to 30 seconds, and then return to the starting position.
- Repeat 2 to 4 times.
Shoulder rotation (lying down, with wand)
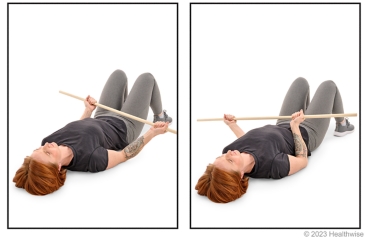
- Lie on your back. Hold a wand with both hands with your elbows bent and palms up. You can also use a broom handle or anything stiff and about 3 feet long.
- Hold your elbows close to your body, and move the wand across your body toward the affected arm.
- Hold for 15 to 30 seconds, and then return to the starting position.
- Repeat 2 to 4 times.
- It's a good idea to repeat these steps toward your other arm.
Wall climb (to the side)
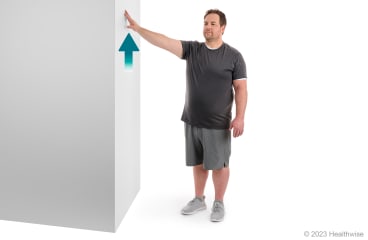
- Stand with your affected shoulder toward the wall, about an arm's length away.
- With your affected arm slightly in front of you (about 30 degrees), walk your fingers up the wall as high as pain permits. Keep your shoulder relaxed and down, not shrugged. Keep your body straight, and don't lean to the side.
- Hold that position for at least a few seconds.
- Slowly walk your fingers back down to the starting position.
- Repeat at least 2 to 4 times. Try to reach higher each time.
- It's a good idea to repeat these steps with your other arm.
Wall climb (to the front)
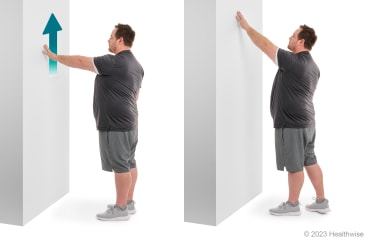
- Face a wall, and stand so your fingers can just touch it.
- Keeping your shoulder down (don't shrug), walk the fingers of your affected arm up the wall as high as pain permits. Keep your back straight. Don't arch your back.
- Hold that position for at least a few seconds.
- Slowly walk your fingers back down.
- Repeat at least 2 to 4 times. Try to reach higher each time. When you are able to reach higher, you can take a step toward the wall as you walk your fingers up, then step back as you walk your fingers back down.
- It's a good idea to repeat these steps with your other arm.
Shoulder-blade squeeze

- Sit or stand up straight with your arms at your sides.
- Keep your shoulders relaxed and down, not shrugged.
- Squeeze your shoulder blades down and together.
- Hold for about 6 seconds, then relax.
- Repeat 8 to 12 times.
Scapular arm reach (lying down)
- Lie on your back on a firm surface, like the floor or a firm bed. You can bend your knees or put a pillow under your knees.
- Point your arms toward the ceiling. Keep your elbows straight.
- Reach higher toward the ceiling. Keep your elbows straight. All motion should be from your shoulder blades. Your shoulders will come off the floor or bed a little bit.
- Slowly relax and return your arms to the starting position.
- Repeat 8 to 12 times.
Arm raise to the side

- Start with your affected arm at your side, with your palm facing forward.
- Slowly raise your affected arm to the side.
- Hold the position for 1 to 2 seconds. Then slowly lower your arm back to your side. If you need to, bring your other arm across your body and place it under the elbow as you lower your affected arm. Use that other arm to keep your affected arm from dropping down too fast.
- Repeat 8 to 12 times.
- It's a good idea to repeat these steps with your other arm.
- Keep your arm a little in front of your body (about 30 degrees), not straight out to the side.
- As you move, keep your shoulder relaxed (don't shrug) and your thumb up.
- Stop before your arm is at shoulder height.
When you first start out, don't hold any extra weight in your hand. As you get stronger, you may use a 1- to 2-pound weight, a small can of food, or a filled water bottle.
Shoulder flexion (isometric)
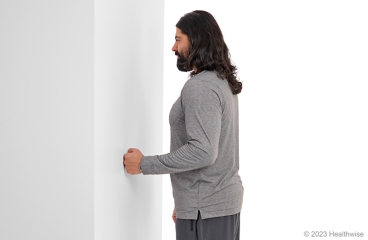
- Hold your affected arm against your body, and bend your elbow about 90 degrees (like the letter "L"), with your hand straight ahead. Make a closed fist, with your thumb on top.
- Face a wall, and step forward until your fist is against the wall. Your elbow should still be against your body.
- Press your fist against the wall with about half of your strength or less. Don't let your body move backward as you press.
- Hold for about 6 seconds, and then relax.
- Repeat 8 to 12 times.
- It's a good idea to repeat these steps with your other arm.
Shoulder extension (isometric)
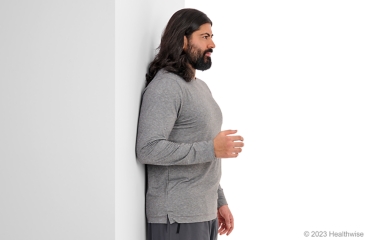
- Stand with your back against a wall and the upper part of your affected arm against the wall. Bend your elbow about 90 degrees (like the letter "L"), with your hand straight ahead.
- Press your elbow back against the wall with about half of your strength or less. Don't let your body move forward as you press.
- Hold for about 6 seconds, and then relax.
- Repeat 8 to 12 times.
- It's a good idea to repeat these steps with your other arm.
Wall push-up
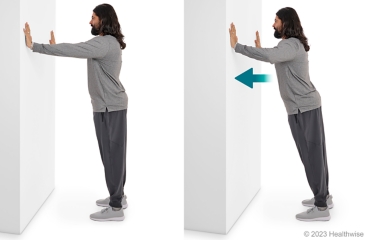
- Stand facing a wall with your feet about 12 to 24 inches from the wall. If you feel any pain when you do this exercise, stand closer to the wall.
- Place your hands on the wall at shoulder height, slightly wider apart than your shoulders. Turn your fingers out a little, rather than straight up and down.
- Slowly bend your elbows and bring your face toward the wall, keeping your shoulders and hips lined up. Then slowly push back to the starting position. Keep the motion smooth and controlled.
- Repeat 8 to 12 times.
When you can do this exercise against a wall with ease and no pain, you can try it against a counter. You can then slowly progress to the end of a couch, then to a sturdy chair, and finally to the floor.
Resisted row
- Anchor an exercise band at about waist level. You can loop the band around a solid object, like a bedpost or handrail. Or you can tie a knot in the middle of the band and shut a door on the band so the knot is on the other side of the door. (Or you can have someone hold one end of the loop to provide resistance.)
- Stand or sit facing where you have placed the band. Hold one end of the band in each hand.
- Hold your arms out in front of you. Adjust your hold on the band so you have some tension on it.
- With your shoulders relaxed, pull the bands back, and move your shoulder blades toward each other. Your elbows will pass along your waist.
- Slowly return to the starting position.
- Repeat 8 to 12 times.
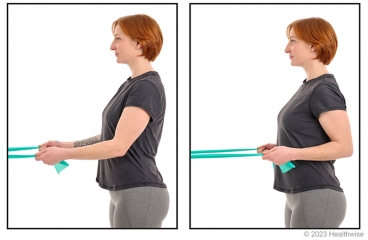
Shoulder internal rotation (resisted)
- Tie the ends of an exercise band together to form a loop. Attach one end of the loop to a secure object, or shut a door on it to hold it in place. Or you can tie a knot in one end of the band and shut the door with the knot on the other side. The band should be at about waist height.
- Stand or sit with your affected side toward the door.
- Hold the free end of the exercise band with the hand of your affected arm, and bend your elbow to 90 degrees. Keep your upper arm against your body. You can squeeze a rolled towel between your elbow and your body for comfort. This will help keep your arm at your side.
- Start with your arm pointing straight ahead and your shoulder relaxed. Slowly rotate your forearm toward your body until it touches your belly. As you do this, keep your elbow and upper arm firmly tucked against the towel or at your side. Slowly move it back to where you started. Your shoulder should stay relaxed throughout the exercise.
- Repeat 8 to 12 times.
- It's a good idea to repeat these steps with your other arm.
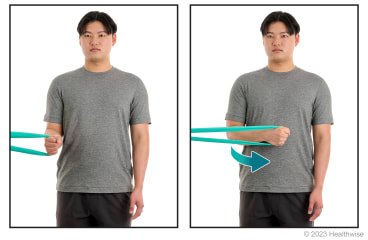
Shoulder external rotation (resisted)
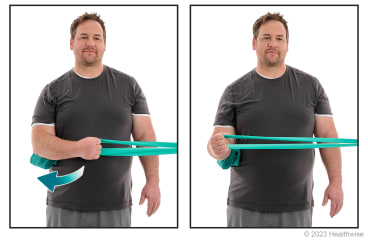
- Tie the ends of an exercise band together to form a loop. Attach one end of the loop to a secure object, or shut a door on it to hold it in place. Or you can tie a knot in one end of the band and shut the door with the knot on the other side. The band should be at about waist height.
- Stand or sit with your unaffected side toward the door.
- Hold one end of the band with the hand of your affected arm, and bend your elbow to 90 degrees. Keep your upper arm against your body. You can squeeze a rolled towel between your elbow and your body for comfort. This will help keep your arm at your side.
- Start with your forearm across your belly and your shoulder relaxed. Slowly rotate your forearm out away from your body. Keep your elbow and upper arm tucked against the towel roll or the side of your body until you begin to feel tightness in your shoulder. Slowly move your arm back to where you started. Your shoulder should stay relaxed throughout the exercise.
- Repeat 8 to 12 times.
- It's a good idea to repeat these steps with your other arm.
Current as of: July 24, 2025
Author: Ignite Healthwise, LLC Staff
Clinical Review Board
All Ignite Healthwise, LLC education is reviewed by a team that includes physicians, nurses, advanced practitioners, registered dieticians, and other healthcare professionals.