How to do the exercises
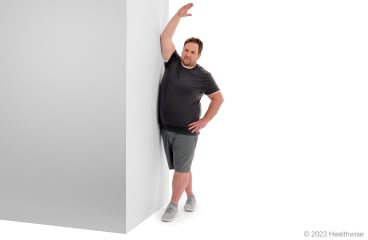
Iliotibial band stretch
slide 1 of 8
slide 1 of 8, Iliotibial band stretch,
- Stand a few inches from a wall, with your affected hip toward the wall. If you are not steady on your feet, hold on to a chair or counter.
- Stand on the leg with the affected hip. Then cross your other leg in front of it.
- Let your affected hip drop out to the side of your body and against the wall. Then lean away from your affected hip until you feel a stretch. You can take the arm that's against the wall and raise it over your head as you lean away from your hip.
- Hold the stretch for 15 to 30 seconds.
- Repeat 2 to 4 times.
- It's a good idea to repeat these steps with your other hip.
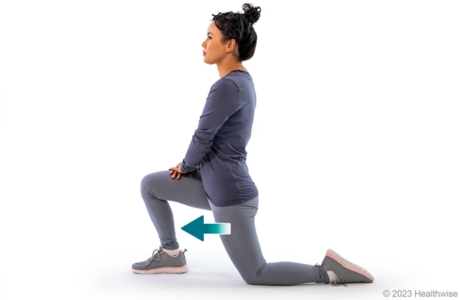
Hip flexor stretch (kneeling)
slide 2 of 8
slide 2 of 8, Hip flexor stretch (kneeling),
- Kneel on your affected leg and bend your other leg out in front of you, with that foot flat on the floor. If you feel discomfort in the front of your knee, place a towel under your knee.
- Keeping your back straight, slowly push your hips forward. You should feel a stretch in the upper thigh of your back leg and hip.
- Hold the stretch for at least 15 to 30 seconds.
- Repeat 2 to 4 times.
- It's a good idea to repeat these steps with your other leg.
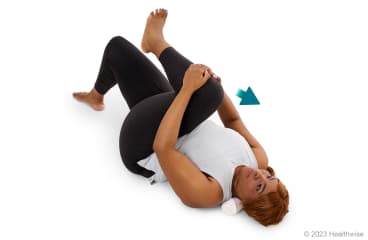
Piriformis stretch (from legs bent)
slide 3 of 8
slide 3 of 8, Piriformis stretch (from legs bent),
- Lie on your back with your knees bent.
- Lift your affected leg and rest that ankle on your other knee.
- Use your hands to gently pull your knee toward your opposite shoulder. You should feel a stretch in your buttock and hip.
- Hold for 15 to 30 seconds.
- Repeat 2 to 4 times.
- It's a good idea to repeat these steps with your other leg.
Hamstring stretch (lying down)

slide 4 of 8
slide 4 of 8, Hamstring stretch (lying down),
- Lie flat on your back with your legs straight. If you feel discomfort in your back, place a small towel roll under your lower back.
- Holding the back of your affected leg, lift your leg straight up and toward your body until you feel a stretch at the back of your thigh.
- Hold the stretch for at least 15 to 30 seconds.
- Repeat 2 to 4 times.
- It's a good idea to repeat these steps with your other leg.
Bridging (feet flat)

slide 5 of 8
slide 5 of 8, Bridging (feet flat),
- Lie on your back with both knees bent and your feet flat on the floor. Your knees should be bent about 90 degrees.
- Tighten your belly muscles by pulling your belly button in toward your spine. Keep breathing normally and don't hold your breath.
- Push your feet into the floor, squeeze your buttocks, and lift your hips off the floor until your shoulders, hips, and knees are all in a straight line. Keep your hips level.
- Hold for about 6 seconds.
- Slowly lower your hips back to the floor.
- Repeat 8 to 12 times.
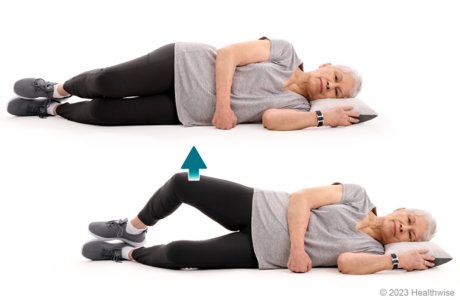
Clamshell for hip problems
slide 6 of 8
slide 6 of 8, Clamshell for hip problems,
- Lie on your side, with your affected leg on top and your head propped on a pillow. Keep your feet and knees together and your knees bent.
- Raise your top knee, but keep your feet together. Do not let your hips roll back. Your legs should open up like a clamshell.
- Hold for about 6 seconds.
- Slowly lower your knee back down.
- Repeat 8 to 12 times.
Alternate arm and leg (bird dog)

slide 7 of 8
slide 7 of 8, Alternate arm and leg (bird dog),
- Start on the floor, on your hands and knees.
- Tighten your belly muscles by pulling your belly button in toward your spine. Be sure you continue to breathe normally and do not hold your breath.
- Keeping your back and neck straight, raise one arm off the floor and hold it straight out in front of you. Be careful not to let your shoulder drop down, because that will twist your trunk.
- Hold for about 6 seconds, then lower your arm and switch to your other arm. Over time, work up to holding for 10 to 30 seconds each time.
- Repeat 8 to 12 times with each arm.
When you feel steady and strong doing this exercise with your arms, try doing the exercise with your legs instead. Raise one leg and hold it straight out behind you. Be careful not to let your hip drop down, because that will twist your trunk.
When holding your leg straight out becomes easier, try raising your opposite arm at the same time.
Lower abdominal strengthening

slide 8 of 8
slide 8 of 8, Lower abdominal strengthening,
- Lie on your back with your knees bent and your feet flat on the floor.
- Tighten your belly muscles by pulling your belly button in toward your spine. Keep breathing normally and don't hold your breath.
- Lift one foot off the floor and bring your knee toward your chest, so that your knee is straight above your hip and your leg is bent like the letter "L."
- Lift the other knee up to the same position.
- Lower one leg at a time to the starting position.
- Keep alternating legs until you have lifted each leg 8 to 12 times.
Keep your belly muscles tight and your back still as you are moving your legs. Keep breathing normally.
Current as of: July 17, 2023
Author: Healthwise Staff
Clinical Review Board
All Healthwise education is reviewed by a team that includes physicians, nurses, advanced practitioners, registered dieticians, and other healthcare professionals.