How to do the exercises
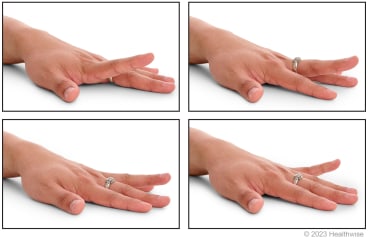
Isolated MP-joint extension (finger straight)
slide 1 of 9
slide 1 of 9, Isolated MP-joint extension (finger straight),
- Place your affected hand flat on a table.
- Lift your affected finger off the table and then lower it. For some types of problems, you may be asked to do each finger, one at a time.
- Repeat 8 to 12 times.
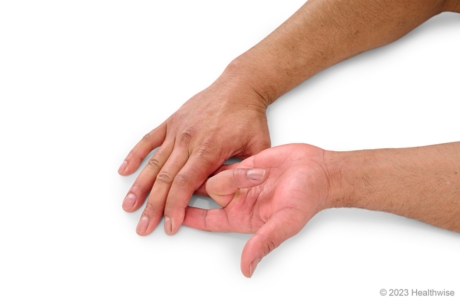
MP-joint extension
slide 2 of 9
slide 2 of 9, MP-joint extension,
- Place your unaffected hand on a table, palm up. Rest your affected hand on top with your fingers loosely curled.
- Slowly straighten the joints of your affected hand where your fingers connect to your hand so that only the top two joints of your fingers are bent. Your fingers will look like a hook.
- Move back to your starting position.
- Repeat 8 to 12 times.
- It's a good idea to repeat these steps with your other hand.
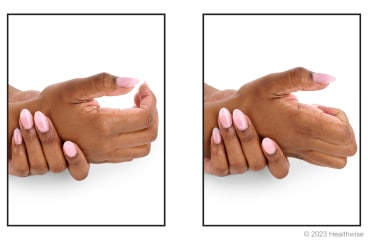
Isolated DIP-joint flexion
slide 3 of 9
slide 3 of 9, Isolated DIP-joint flexion,
- Grasp your affected finger with your other hand. Your thumb will be on the top side of your finger just below the joint that is closest to your fingernail.
- Slowly bend your affected finger only at the joint closest to your fingernail. For some types of problems, you may be asked to do this with each finger.
- Hold for about 6 seconds.
- Repeat 8 to 12 times.
Isolated PIP-joint extension
slide 4 of 9
slide 4 of 9, Isolated PIP-joint extension,
- Place your good hand on a table, palm up. Put the pinkie side of your affected hand in your palm.
- Use the thumb and fingers of your good hand to grasp below the middle joint of your affected finger. This helps you hold that finger steady.
- Bend and then straighten the middle joint of your affected finger. For some types of problems, you may be asked to do each finger, one at a time.
- Repeat 8 to 12 times.
Isolated PIP-joint flexion
slide 5 of 9
slide 5 of 9, Isolated PIP-joint flexion,
- Place the hand with the affected finger flat on a table, palm up. With your other hand, press down on the fingers that are not affected. Your affected finger will be free to move.
- Slowly bend your affected finger.
- Hold for about 6 seconds. Then straighten your finger.
- Repeat 8 to 12 times.
Imaginary ball squeeze
slide 6 of 9
slide 6 of 9, Imaginary ball squeeze,
- Pretend to hold an imaginary ball.
- Slowly bend your fingers around the imaginary ball, and squeeze the "ball" for about 6 seconds. Then slowly straighten your fingers to release the "ball."
- Repeat 8 to 12 times.
- It's a good idea to repeat these steps with your other hand.
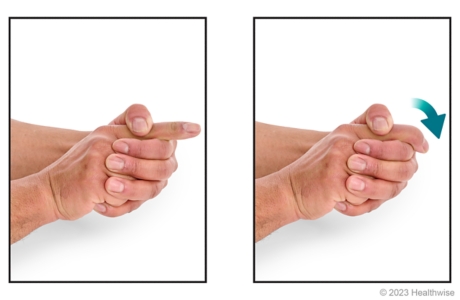
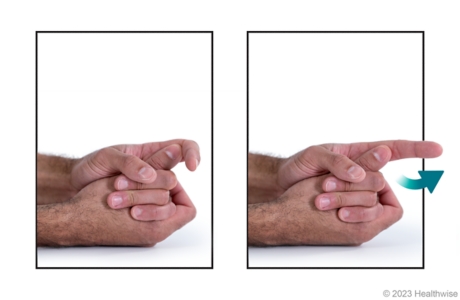
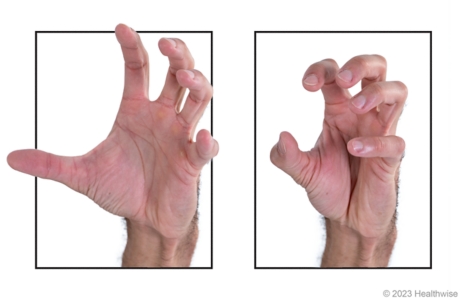
Tendon glides

slide 7 of 9
slide 7 of 9, Tendon glides,
- In this exercise, the steps follow one another to a make a continuous movement.
- Hold your hand upward. Your fingers and thumb will be pointing straight up. Your wrist should be relaxed, following the line of your fingers and thumb.
- Curl your fingers so that the top two joints in them are bent, and your fingers wrap down. Your fingertips should touch or be near the base of your fingers. Your fingers will look like a hook.
- Make a fist by bending your knuckles. Your thumb can gently rest against your index (pointing) finger.
- Unwind your fingers slightly so that your fingertips can touch the base of your palm. Your thumb can rest against your index finger.
- Return to your starting position, with your fingers and thumb pointing up.
- Repeat the series of motions 8 to 12 times.
- It's a good idea to repeat these steps with your other hand.
Towel squeeze

slide 8 of 9
slide 8 of 9, Towel squeeze,
- Place a small towel roll on a table.
- With your palm facing down, grab the towel. Squeeze it for about 6 seconds. Then slowly straighten your fingers to release the towel.
- Repeat 8 to 12 times.
- It's a good idea to repeat these steps with your other hand.
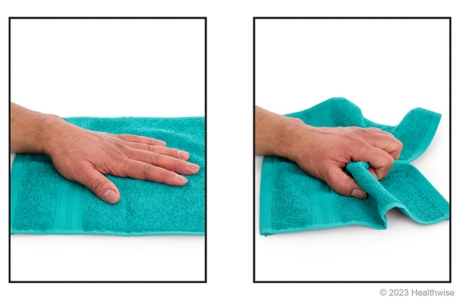
Towel grab
slide 9 of 9
slide 9 of 9, Towel grab,
- Fold a small towel in half, and lay it flat on a table.
- Put your hand flat on the towel, palm down. Grab the towel, and scrunch it toward you until your hand is in a fist.
- Slowly straighten your fingers to push the towel back so it is flat on the table again.
- Repeat 8 to 12 times.
- It's a good idea to repeat these steps with your other hand.
Current as of: July 17, 2023
Author: Healthwise Staff
Clinical Review Board
All Healthwise education is reviewed by a team that includes physicians, nurses, advanced practitioners, registered dieticians, and other healthcare professionals.